Homeschool Battery Experiment
Make your own Fireflies!
When we were getting ready for our day without electricity, I came across a great idea for making fireflies from GeekDad. I didn't get my act together enough to try it at the time - but we did have a play with it recently.

The idea is to let your children loose with some batteries and LEDs.
Without me having to provide too much guidance - we managed to create some great battery experiments! I thought this was a great (low-key) way to do some homeschool science.
This project is really simple and would work very well with younger children (as long as they are past the age of putting things in their mouths!).
What you need:
- Some Batteries
We used a pack of 3v CR2032 Lithium batteries. In the US you can buy packs of 25 like this one
- Some 5mm LED bulbs
I got a mix of colours - about 20 of them was enough for playing with. You can get them from a hardware store (or order from Maplin in the UK.
Homeschool Science
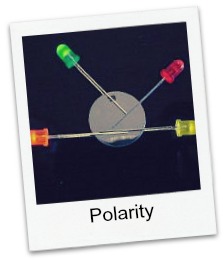 |
The first thing we looked at was polarity.
The bulbs only work if they are placed on the battery the right way around (slip a wire from the bulb on each side of the battery - either hold it or tape it in place). It took the children some time to figure out that this is why they sometimes worked - and sometimes didn't! |
Because we had lots of Led bulbs we then looked at;
|
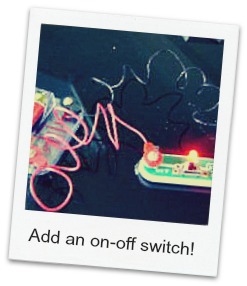
We taped some bulbs to the batteries, put them into jars and made little night-lights (very pretty!). Of course, then the children wanted an on-off switch!! Luckily clever Mom had already pulled some electronic componants together from an old electronics kit. Voila!! |
 |
It would be a great thing to introduce on a camping trip, or at a sleepover - or just for strewing.

This would be a fun thing to start a science project with, and get your teenagers interested in batteries and electricity.
Could they make a battery themselves that would light the led bulbs? How many bulbs can they light at a time with different voltage of batteries? Could they make an LED flashing sign? They might also try making a cluster light - instructions here.

More Great Homeschool Science Ideas
Go to Homeschooling-ideas.com Home Page from Battery Experiments


Lovely messages sent from visitors like you:
Oh my goodness! I am a home schooling mum of 4 and I have NEVER found a better site! Thank you so much.
Blessings, Jenny (New Zealand)
I wanted to say THANK YOU for your fabulous website. I found your website, and finally I have the confidence to take the plunge and take my daughter out of school and educate her at home, thank you, thank you.
Marina (UK)
I cannot get over how much great information and super ideas you have here. Fantastic!
Ruralmama (USA)
This is simply fabulous!! I just now found this site and I'm so excited!! The opportunities and suggestions as well as the need to inspire are exactly what I have been searching to fulfill!! I'm so thrilled to get started and even more excited to continue to explore all of the fabulous suggestions and creative ideas you have offered here!!! Thank you, thank you, thank you!
Jennifer (USA)