Dyeing Yarn and Fiber with Kids
Here are some easy instructions on how to dye yarn or fiber with kool aid, food coloring or acid dyes.
This is a great project to try as part of homeschooling history or science.
People have been dying yarn and fibre for generations so it ties really well into studying different historical periods. Why not take a look at what colors were available in different time periods for example?
Different scientific methods have been used in dying. It might be interesting to look at why different methods are needed for different types of material. In this project we are using a natural fiber - a different technique would be needed for acrylic.
Materials Needed for Dyeing
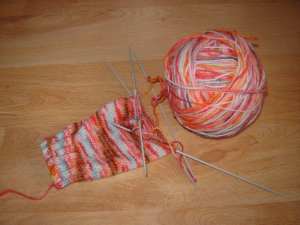
To start dyeing yarn you will first need some yarn or fiber.
Natural fibers work much better for this, so choose wool, alpaca, mohair, or silk - not acrylic. Yarn should be available at your local yarn shop, ebay or Amazon. Choose a light color - white or cream is best.
If you would like to try dyeing fiber (for needlefelting or spinning later), then check ebay or one of the online stores listed below. For beginner spinners a wool (like Merino or Blue Faced Leicester) would be best - and buying a top or roving makes it easy to use.
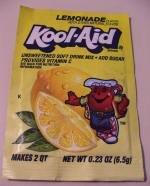 You also need dye. For dyeing yarn with young children, Kool Aid or food coloring is the safest option. My instructions will also work with acid dyes, natural dyes or dylon dyes. Check out the stockists below.
For Kool Aid you need one packet for every ounce (30 grams) of yarn or fiber you wish to dye. Buy the sort without sugar.
You can see a Kool Aid color chart here.
You will also need :
Dyeing Yarn Stockists
I haven't checked prices so you may want to shop around before making your purchases. I just wanted to give you an idea of what you were looking for!US Stockists
UK Stockists
Australian Stockists
I am struggling to find a fibre/yarn supplier that will supply in small quantities. I will update as soon as I can locate one!
How to Dye Yarn
If you have bought your yarn in balls, then you will need to make a skein for dyeing.
Wrap your yarn around the legs of chairs or tables to make a long length - and keep wrapping around and around until all the yarn is used up. The longer the skein, the more colors you will be able to add - but there is more danger of tangles too.
Tie some spare yarn loosely around the skein in several places to hold it together.
Soak your yarn/fiber in warm water for 10 to 20 minutes. Treat it gently - you don't want it to felt. Soaking softens the fibers and makes dyeing yarn faster and easier.
When you are ready to dye, lift the yarn out of the water and gently squeeze it. You want to get rid of excess water, but still leave it wet. I tell my children to just squeeze out enough water that it doesn't drip all over the floor when they carry it to the dyeing area!
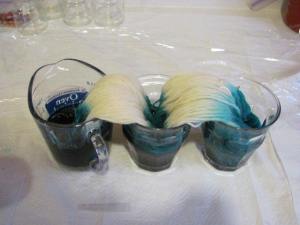
Use separate containers for each color. Mix up 1 pint of warm water with 1 packet of kool aid, or 1 teaspoon of commercial dyes (or according to the instructions). If you are using food coloring, just add the coloring until you get a nice strong color.
If you are using commercial dyes then be careful not to breathe the powder. You should also not use containers that you would later use for food preparation.
Add 1 tablespoon of vinegar to each container. This is to make the solution more acid - and it is a combination of acidity and heat that will 'set' the color. If you are doing this as part of your homeschooling science, then now is a good time to do a litmus test!
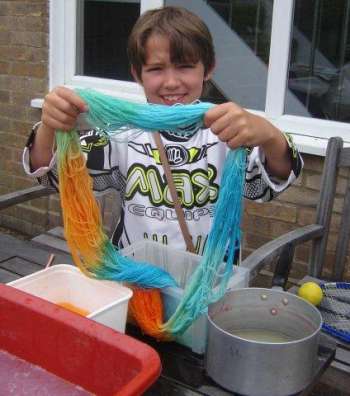
With small children it is easiest (that is, less messy!) to place the yarn in the different containers and let the color soak up into it. Leave the yarn until it has taken up most of the color from the containers.
For older children it is fun to 'paint' the yarn. Lay out some plastic wrap onto your work surface, and then lay the yarn onto that. Pour the dyes over the yarn in different places. Where the dyes meet, you will get color mixing. Dyeing yarn this way can produce some beautiful results.

When your color has soaked into the yarn or fiber, wrap it up in plastic wrap to make a package. I usually use two or three layers to stop the package leaking.
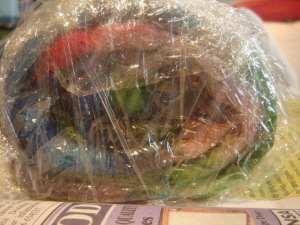
Because you don't want the color to bleed out when you wash the yarn/fiber, you now need to heat the yarn and set the color.
There are several ways you can do this :
- Put the yarn package in the microwave for 5 minutes. Keep an eye on it to make sure the package stays steamy. You don't want the yarn to dry out or it will start to burn. Leave it to cool before you try to remove it from the microwave.
- Use a steamer on your stove top. Place the yarn package into the steamer (so it doesn't touch the water) and steam for 20 to 30 minutes. The plastic wrap will puff when the yarn is good and hot. Leave it to cool before handling. If you don't have a steamer, then place a bowl in the bottom of a large saucepan, and rest a sieve on the bowl to keep the package out of the water.
Handle your yarn or fiber very gently while it is hot so it does not felt. When it is cool, rinse it carefully and hang it up to dry.
Once dry, your yarn can be wound into a ball and is ready to use.

Creative Homeschooling
Click below now to get inspired!
Fun Activities for Kids
Kids Craft Project Ideas
Homeschooling-Ideas › Fun Kids Craft Ideas › Dyeing Yarn


Lovely messages sent from visitors like you:
Oh my goodness! I am a home schooling mum of 4 and I have NEVER found a better site! Thank you so much.
Blessings, Jenny (New Zealand)
I wanted to say THANK YOU for your fabulous website. I found your website, and finally I have the confidence to take the plunge and take my daughter out of school and educate her at home, thank you, thank you.
Marina (UK)
I cannot get over how much great information and super ideas you have here. Fantastic!
Ruralmama (USA)
This is simply fabulous!! I just now found this site and I'm so excited!! The opportunities and suggestions as well as the need to inspire are exactly what I have been searching to fulfill!! I'm so thrilled to get started and even more excited to continue to explore all of the fabulous suggestions and creative ideas you have offered here!!! Thank you, thank you, thank you!
Jennifer (USA)