Smoke Firing in a Trash Can
Firing Ceramics at Home
It seems like the easiest (and safest!) method to try as it doesn't need a lot of equipment or space. It also turned out to be reasonable inexpensive which added to it's appeal.
We had several tries at this method and did find that there were certain things you could do to get better results. Our first try resulted in quite a few broken 'burnt looking' pots but we did get better as we learned more.
Don't give up if you don't get great results at first - and do follow our tips and techniques.
How to Smoke Fire Pottery
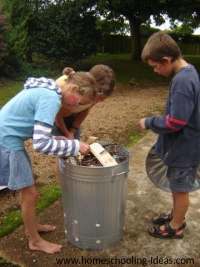
We were really inspired to try this method by the following video. I didn't want to dig a hole, so we bought a metal incinerator from the hardware store. I think next time I would buy a trash can/dustbin as I am not sure so much air should be getting into the firing.You also need a large amount of sawdust - we went to a pet shop for ours, and also gathered extra leaves and small twigs.
Tips and Techniques
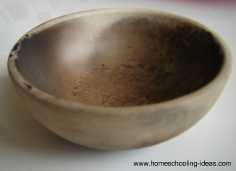
We didn't realise that an important part of the video is where he burnishes the clay piece - to burnish your clay model, rub it gently with the back of a spoon until it becomes very smooth and shiny. In our first firing, the one bowl we used this technique on came out very nice, but the others mostly just looked burnt.I also recommend your clay pieces are really dry before you try to fire them. There is more chance of breakages if the clay still has moisture in it. To check, place your hand on the bottom of the piece and see if it is room temperature. A cold model usually means there is still water within the clay.
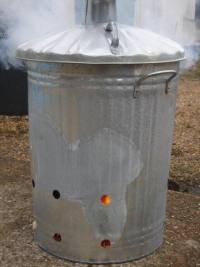
Build up layers of sawdust and pottery inside the dustbin. Light a fire on the top, and when it dies down a little put the lid on. Leave to burn slowly for about 12 hours or so - it may take even longer before the pots are cool enough to handle. The dustbin gets very hot and there is a danger the pottery will explode - so don't let the children play near it.
We had no problems at all firing this way, but got the following message so thought I had better add this.
Caution:
"Please, please do not use any galvanized metal, such as the dustbin you have shown, for any firing of any kind. The zinc fumes that come from the coating are very hazardous and can even be deadly. I am a blacksmith and this is always a safety concern with those who work with hot metal."
We really enjoyed this homeschooling project, and it is something we would love to try again in the future. If you try out this method in your homeschooling, I would love to hear how it went.
Find out more about how to fire clay at home without a kiln
I just wanted to tell you that after seeing the 'build your own kiln' resource last month my 11 year old daughter and I had a go at smoke firing and it was really successful.
We had to 'adapt' the idea a bit as we only have a small garden so we made a pit out of an old barbeque, filled it with kindling and sawdust, buried the pots that my daughter had made inside and lit it. We let it burn away for about an hour (and made toast from the fire to keep us sustained) then we put on the lid and let it smoulder until the following morning. My daughter was thrilled with the results and spent a happy morning cleaning and waxing her finished pots and models. We were really lucky and had no breakages either and will be trying it again soon with salt and copper wire on the pots to what effects we can get.
Ros, UK
Home › Kids Craft Ideas › Firing Clay at Home › Smoke Firing


Lovely messages sent from visitors like you:
Oh my goodness! I am a home schooling mum of 4 and I have NEVER found a better site! Thank you so much.
Blessings, Jenny (New Zealand)
I wanted to say THANK YOU for your fabulous website. I found your website, and finally I have the confidence to take the plunge and take my daughter out of school and educate her at home, thank you, thank you.
Marina (UK)
I cannot get over how much great information and super ideas you have here. Fantastic!
Ruralmama (USA)
This is simply fabulous!! I just now found this site and I'm so excited!! The opportunities and suggestions as well as the need to inspire are exactly what I have been searching to fulfill!! I'm so thrilled to get started and even more excited to continue to explore all of the fabulous suggestions and creative ideas you have offered here!!! Thank you, thank you, thank you!
Jennifer (USA)